Navigation:
Installation, Configuration and Operation of Hardware > Installation and Configuration of Control Devices > Installing the SR2 Receiver >> Connecting the SR2 Receiver Unit's Cables
Connecting the SR2 Receiver Unit's Cables

Contents
Connecting the External Receiver Unit
| Note: | Not all SR2s come with an External Receiver; some SR2s have an Internal Receiver with an aerial mounted on the top of the unit. |
In such cases, the following instructions will not be needed.
1.The Receiver Unit will come supplied with 3m of cable pre-wired to it. This should be wired to JP14 on the SR2.
2.Open the SR2.
3.Feed the RX Receiver Unit cable through one of the glands in the base of the SR2.
4.Connect the cable to JP14 as below:
Pin 1: Unused (on left)
Pin 2: Unused
Pin 3: Yellow (RX data)
Pin 4: Red (RX power)
Pin 5: Blue (Signal Strength)
Pin 6: Unused
Pin 7: Green (GND)
| Note: | Incorrect wiring can seriously damage the SR2; always double-check the wiring before connecting the power! |
| 5. | Screw the aerial onto the Receiver Unit. |
Figure 102
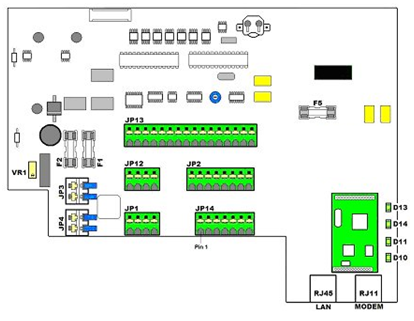
SR2 Main Components – Schematic